Sanya_
Почетный гость
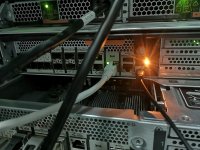
Здравствуйте, было отключение энергии, УПС продержал сколько смог, В итоге NetApp FAS 8200 отключился и не стартанул сам. Полки с Дисками запустились.
Выключили NetApp по питанию и включили снова. Пошел продув и на первой Ноде загорелись только индикаторы Эзернет и Оранжевый (!) . На второй Ноде вообще ничего. Есть идеи как его реанимировать.
Спасибо.
Выключили NetApp по питанию и включили снова. Пошел продув и на первой Ноде загорелись только индикаторы Эзернет и Оранжевый (!) . На второй Ноде вообще ничего. Есть идеи как его реанимировать.
Спасибо.